Windows端运行LLaMA语言模型
Windows端运行LLaMA语言模型
写在前面
2023 年 2 月 24 日,Meta AI 发布了 650 亿参数的大语言模型LLaMA ,3 月 3 日,有人“泄露”了它的训练参数,当然也可以通过官方申请得到对应参数(一般申请都会给通过)。本次我们将运行 llama-int8 以及带有 WebUI 的 4 位量化模型 GPTQ-for-LLaMA
概要
-
模型有 7B,13B,30B,65B 的参数分类
-
Meta 宣称 LLaMA-13B 已经超越了 GPT-3 的性能
-
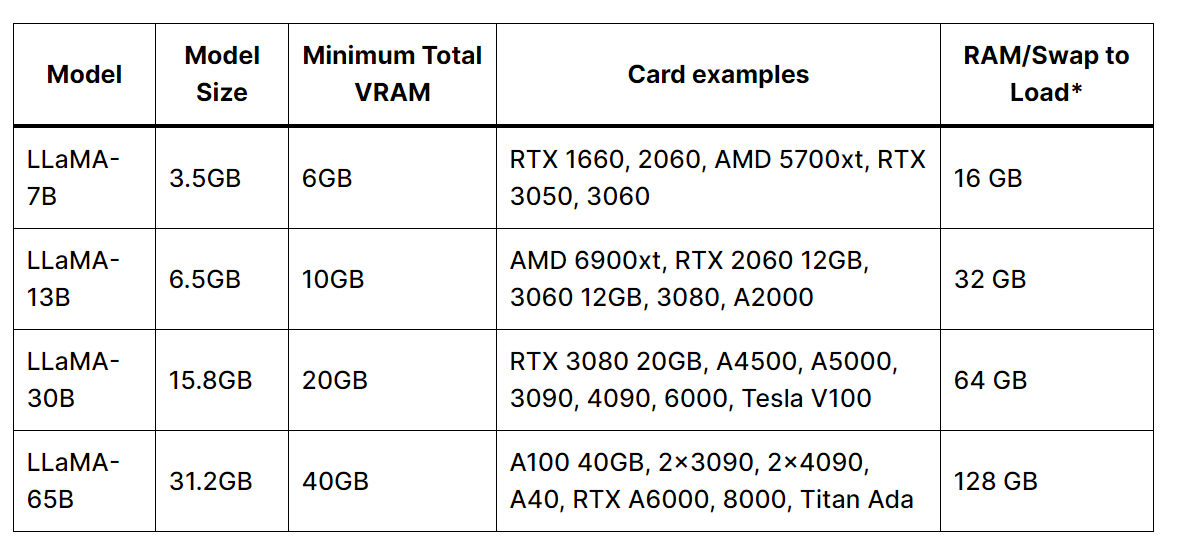
模型运行中内存及显存占用情况:
 不同模型版本:
 -
Meta AI 原始模型 https://github.com/facebookresearch/llama
- llama-int8 8 位量化模型 https://github.com/tloen/llama-int8
- GPTQ-for-LLaMA 4 位量化模型 https://github.com/qwopqwop200/GPTQ-for-LLaMa
环境配置
- Windows 10 Professional 64 Bit
- NVIDIA RTX 3090
- CUDA 11.6
- cuDNN 8.8.1
创建 conda 环境
conda create -n textgen python=3.10.9
conda activate textgen
pip install torch==1.13.1+cu116 torchvision==0.14.1+cu116 torchaudio==0.13.1 --extra-index-url https://download.pytorch.org/whl/cu116
简洁安装
这是我所创建的 conda 虚拟环境 requirements.txt 文件:
accelerate==0.18.0
bitsandbytes @ git+https://github.com/Keith-Hon/bitsandbytes-windows.git@85ff11a7f04af73bc83cbe6ed0eb1a77ade0697b
datasets==2.10.1
fastapi==0.95.0
fairscale==0.4.13
fire==0.5.0
gradio==3.24.1
huggingface-hub==0.13.3
peft==0.2.0
sentencepiece==0.1.97
tokenizers==0.13.2
torch==1.13.1+cu116
torchaudio==0.13.1+cu116
torchvision==0.14.1+cu116
transformers @ git+https://github.com/huggingface/transformers@4c01231e67f0d699e0236c11178c956fb9753a17
带有 UI 界面模型运行
git clone https://github.com/oobabooga/text-generation-webui.git
cd text-generation-webui
pip install -r requirements.txt

mkdir repositories
cd repositories
git clone https://github.com/qwopqwop200/GPTQ-for-LLaMa.git
cd GPTQ-for-LLaMa
pip install ninja
conda install -c conda-forge cudatoolkit-dev
python setup_cuda.py install
- 如果
setup_cuda.py安装失败,下载.whl 文件 ,并且运行pip install quant_cuda-0.0.0-cp310-cp310-win_amd64.whl安装 - 目前,
transformers刚添加 LLaMA 模型,因此需要通过源码安装 main 分支,具体参考huggingface LLaMA - 大模型的加载通常需要占用大量显存,通过使用 huggingface 提供的 bitsandbytes 可以降低模型加载占用的内存,却对模型效果产生比较小的影响,具体可阅读A Gentle Introduction to 8-bit Matrix Multiplication for transformers at scale using Hugging Face Transformers, Accelerate and bitsandbytes ,windows 平台用户需要通过源码安装[bitsandbytes-windows](https://github.com/fa0311/bitsandbytes-windows]
模型参数下载
建议首先在模型根目录下创建models文件夹:
-
Meta AI 原始参数文件 models
├── llama-7b
│ ├── consolidated.00.pth
│ ├── params.json
│ └── checklist.chk
└── tokenizer.model
参数 Torrent 文件: Safe-LLaMA-HF (3-26-23).zip
参数 Magnet 链接: magnet:?xt=urn:btih:ZXXDAUWYLRUXXBHUYEMS6Q5CE5WA3LVA&dn=LLaMA
- Huggingface 转化的参数文件
在 text-generation-webui 的根目录下创建 models 文件夹,例如这里我们想导入 13b 的参数,使用 git clone 到decapoda-research/llama-13b-hf
复制对应参数,更名文件为
llama-13b
# Make sure you have git-lfs installed (https://git-lfs.com)
git lfs install
git clone https://huggingface.co/decapoda-research/llama-13b-hf

# if you want to clone without large files – just their pointers
# prepend your git clone with the following env var:
GIT_LFS_SKIP_SMUDGE=1>)
我已经下载好了两类参数文件至百度网盘 ,提取码:1234
运行
# run GPTQ-for-LLaMA web client
python server.py --cai-chat --model llama-7b --no-stream

# run llama-int8
python example.py --ckpt_dir [TARGET_DIR]/7b --tokenizer_path [TARGET_DIR]/tokenizer.model --max_batch_size=1
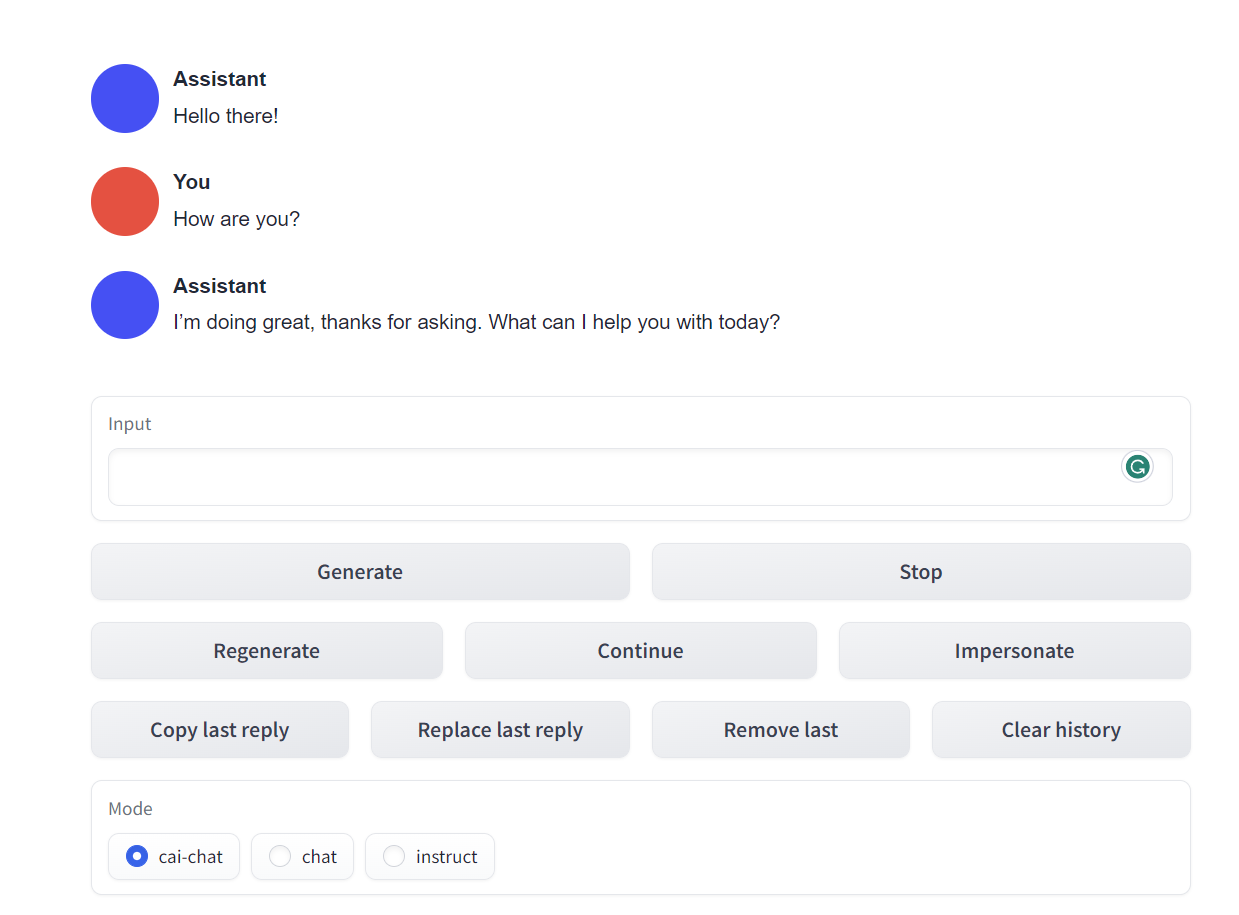
带有 webui 的模型运行如下:


内网端口映射
由于我个人使用的是校园网,需要映射到公网才可公开访问,体验了几个工具暂时使用ngrok 作为临时替代品。
📖 参考文献
- How to run Meta’s LLaMA on your computer (Windows) - Aituts
- [A Gentle Introduction to 8-bit Matrix Multiplication for transformers](https://huggingface.co/blog/hf-bitsandbytes-integration
- LLaMA
💬 评论
